Difference between revisions of "Alchemical Hydra"
| Line 55: | Line 55: | ||
# Throughout the phase, the hydra will occasionally walk to the centre of the chamber and become un-attackable. Upon reaching the centre, it breathes 5x5 layer of fire to the player's sides based on their location before staring down the middle and launching a tracking fire. This tracking fire follows the player's movement, and travels significantly faster the further the player is (or if they start running). Turning off run and walking in a line as the fire trails is the best course of action. Getting hit by any of the fires will result in the player taking up to 20 damage, followed by a subsequent bleed of 5 damage for five hits. It is '''highly advised''' to get Hydra onto the {{Colour|blue|'''blue chemical pool'''}} before she walks to the center to kill her as fast as possible. | # Throughout the phase, the hydra will occasionally walk to the centre of the chamber and become un-attackable. Upon reaching the centre, it breathes 5x5 layer of fire to the player's sides based on their location before staring down the middle and launching a tracking fire. This tracking fire follows the player's movement, and travels significantly faster the further the player is (or if they start running). Turning off run and walking in a line as the fire trails is the best course of action. Getting hit by any of the fires will result in the player taking up to 20 damage, followed by a subsequent bleed of 5 damage for five hits. It is '''highly advised''' to get Hydra onto the {{Colour|blue|'''blue chemical pool'''}} before she walks to the center to kill her as fast as possible. | ||
# For the final phase Hydra will use the similar special as in the first phase but this time will only fire one poison blob after the first three attacks. Simply dodge it by moving one step in any direction, and pray protection from ranged or magic depending on Hydra's style. Keep in mind she will keep firing one poison blob after every six attacks once it has occured once. | # For the final phase Hydra will use the similar special as in the first phase but this time will only fire one poison blob after the first three attacks. Simply dodge it by moving one step in any direction, and pray protection from ranged or magic depending on Hydra's style. Keep in mind she will keep firing one poison blob after every six attacks once it has occured once. | ||
<br clear=all> | |||
== Equipment == | |||
<tabber> | |||
Melee= | |||
{| class="wikitable sticky-header" style=width:1850px;style=text-align:center; | |||
! <center>Slot</center> !! colspan="5"|<center>Item (most effective → least effective) </center> | |||
|- | |||
|[[File:Head slot.png|center]] || [[File:Slayer helmet (i).png]] Slayer helm (i)|| [[File:Inquisitor's great helm.png]] Inquisitor's great helm || [[File:Neitiznot faceguard.png]] Neitiznot faceguard || [[File:Statius's full helm.png]] Statius's full helm || [[File:Serpentine helm.png]] Serpentine helm or [[File:Helm of neitiznot.png]] Helm of Neitiznot | |||
|- | |||
|[[File:Neck slot.png|center]] || [[File:Amulet of torture.png]] Amulet of torture || [[File:Amulet of fury.png]] Amulet of fury || [[File:Amulet of strength.png]] Strength amulet || {{NA}} || {{NA}} | |||
|- | |||
|[[File:Cape slot.png|center]] || [[File:Infernal cape.png]] Infernal cape || [[File:Fire cape.png]] Fire cape || [[File:Max cape.png]] Max cape || {{NA}} || {{NA}} | |||
|- | |||
|[[File:Body slot.png|center]] || [[File:Inquisitor's hauberk.png]] Inquisitor's hauberk || [[File:Statius's platebody.png]] Statius's platebody || [[File:Bandos chestplate.png]] Bandos chestplate || [[File:Fighter torso.png]] Fighter torso || [[File:Dharok's platebody.png]] Dharok's platebody (or Barrows platebodies) | |||
|- | |||
|[[File:Legs slot.png|center]] || [[File:Inquisitor's plateskirt.png]] Inquisitor's plateskirt || [[File:Statius's platelegs.png]] Statius's platelegs || [[File:Bandos tassets.png]] Bandos tassets || [[File:Obsidian platelegs.png]] Obsidian platelegs || [[File:Dharok's platelegs.png]] Dharok's platelegs (or Barrows platelegs) | |||
|- | |||
|[[File:Weapon slot.png|center]] || [[File:Dragon hunter lance.png]] Dragon hunter lance || [[File:Ghrazi rapier.png]] Ghrazi rapier || [[File:Blade of saeldor (c).png]] Blade of Saeldor (c) || [[File:Chaotic rapier.png]] Chaotic rapier || [[File:Abyssal tentacle.png]] Abyssal tentacle / [[File:Abyssal vine whip.png]] Abyssal vine whip / [[File:Abyssal whip.png]] Abyssal whip | |||
|- | |||
|[[File:Shield slot.png|center]] || [[File:Avernic defender.png]] Avernic defender ||[[File: Dragon defender.png]] Dragon defender || [[File:Dragonfire shield.png]] Dragonfire shield || [[File:Rune defender.png]] Rune defender || [[File:Crystal shield.png]] Crystal shield | |||
|- | |||
|[[File:Ammo slot.png|center]] || {{NA}} || {{NA}} || {{NA}} || {{NA}} || {{NA}} | |||
|- | |||
|[[File:Hands slot.png|center]] || [[File:Ferocious gloves.png]] Ferocious gloves || [[File:Goliath gloves (black).png]] Goliath gloves || [[File:Barrows gloves.png]] Barrows gloves || [[File:Dragon gloves.png]] Dragon gloves || [[File: Rune gloves.png]] Rune gloves | |||
|- | |||
|[[File:Feet slot.png|center]] || [[File:Primordial boots.png]] Primordial boots || [[File:Steadfast boots.png]] Steadfast boots || [[File:Dragon boots.png]] Dragon boots || [[File:Guardian boots.png]] Guardian boots || [[File:Bandos boots.png]] Bandos boots | |||
|- | |||
|[[File:Ring slot.png|center]] || [[File:Berserker ring (i).png]] Berserker ring (i) || [[File:Ring of suffering (i).png]] Ring of Suffering (i) || [[File:Berserker ring.png]] Berserker ring || [[File:Ring of wealth (i).png]] Ring of wealth (i) || [[File:Ring of wealth (i).png]] Ring of wealth | |||
|- | |||
|[[File:Special attack orb.png]] || [[File:Dragon dagger.png]] Dragon dagger || [[File:Vesta's longsword.png]] Vesta's longsword || [[File:Saradomin godsword.png]] Bandos/Saradomin Gosword || [[File:Dragon warhammer.png]] Dragon warhammer || Any other melee spec weapon | |||
|- | |||
|-| | |||
Ranged= | |||
{| class="wikitable sticky-header" style=width:1850px;style=text-align:center; | |||
! <center>Slot</center> !! colspan="5"|<center>Item (most effective → least effective) </center> | |||
|- | |||
|[[File:Head slot.png|center]] || [[File:Slayer helmet (i).png]] Slayer helm (i)<sup>1</sup> || [[File:Armadyl helmet.png]] Armadyl helmet || [[File:Royal dragonhide coif.png]] Royal coif || [[File:Serpentine helm.png]] Serpentine helm || [[File:Robin hood hat.png]] Robin hood hat or [[File:Blessed coif.gif]] Blessed coif | |||
|- | |||
|[[File:Neck slot.png|center]] || [[File:Necklace of anguish.png]] Necklace of anguish || [[File:Saradomin's murmur.png]] Saradomin's murmur || [[File:Amulet of fury.png]] Amulet of fury || [[File:Amulet of glory.png]] Amulet of glory | |||
|- | |||
|[[File:Cape slot.png|center]] || [[File:Ava's assembler.png]] Ava's assembler || [[File:Ava's accumulator.png]] Ava's accumulator || [[File:Ranging cape.png]] Ranging cape || [[File:Ava's attractor.png]] Ava's attractor || {{NA}} | |||
|- | |||
|[[File:Body slot.png|center]] || [[File:Armadyl chestplate.png]] Armadyl chestplate || [[File:Karil's leathertop.png]] Karil's leathertop || [[File:Royal dragonhide body.png]] Royal d'hide body || [[File:Blessed body.gif]] Blessed body || [[File:Black d'hide body.png]] Black d'hide body | |||
|- | |||
|[[File:Legs slot.png|center]] || [[File:Armadyl chainskirt.png]] Armadyl chainskirt || [[File:Karil's leatherskirt.png]] Karil's leatherskirt || [[File:Royal dragonhide chaps.png]] Royal d'hide chaps || [[File:Blessed chaps.gif]] Blessed chaps || [[File:Black d'hide chaps.png]] Black d'hide chaps | |||
|- | |||
|[[File:Weapon slot.png|center]] || [[File:Toxic blowpipe.png]] Toxic blowpipe || [[File:Zaryte crossbow.png]] Zaryte crossbow|| [[File:Chaotic crossbow.png]] Chaotic crossbow || [[File:Dragon crossbow.png]] Dragon crossbow or [[File:Rune crossbow.png]] Rune Crossbow | |||
|- | |||
|[[File:Shield slot.png|center]] || [[File:Eagle-eye_kiteshield.png]] Eagle-eye kiteshield || [[File:Dragonfire ward.png]] Dragonfire ward || [[File:Twisted buckler.png]] Twisted buckler || [[File:Crystal shield.png]] Crystal shield || [[File:Holy book.png]] God book | |||
|- | |||
|[[File:Ammo slot.png|center]] || | [[File:Ruby dragon bolts (e) 5.png]] Ruby dragon bolts (e) + [[File:Diamond dragon bolts (e) 5.png]] Diamond dragon bolts (e) || [[File:Ruby bolts (e) 5.png]] Ruby bolts (e) + [[File:Diamond_bolts_5.png ]] Diamond bolts (e) || {{NA}} || {{NA}} || {{NA}} | |||
|- | |||
|[[File:Hands slot.png|center]] || [[File:Swift gloves (black).png]] Swift gloves || [[File:Zaryte vambraces.png]] Zaryte vambraces || [[File:Barrows gloves.png]] Barrows gloves || [[File:Black d'hide vambraces.png]] Black d'hide vambraces | |||
|- | |||
|[[File:Feet slot.png|center]] || [[File:Pegasian boots.png]] Pegasian boots || [[File:Glaiven boots.png]] Glavien boots || [[File:Ranger boots.png]] Ranger boots || [[File:Blessed boots.gif]] Blessed boots || [[File:Boots of brimstone.png]] Boots of brimstone | |||
|- | |||
|[[File:Ring slot.png|center]] || [[File:Archers ring (i).png]] Archers ring (i) || [[File:Ring of suffering (i).png]] Ring of Suffering (i) || [[File:Archers ring.png]] Archers ring || [[File:Ring of wealth (i).png]] Ring of wealth (i) || [[File:Ring of wealth (i).png]] Ring of wealth | |||
|- | |||
|[[File:Special attack orb.png|center]] || [[File:Saradomin godsword.png]] Saradomin godsword / [[File:Nightmare staff.png]] Eldritch nightmare staff || [[File:Crystal spear.png]] Crystal spear || [[File:Toxic blowpipe.png]] Toxic blowpipe || [[File:Dragon claws.png]] Dragon claws || [[File:Dragon dagger.png]] Dragon dagger | |||
|- | |||
|-| | |||
</tabber> | |||
Revision as of 13:22, 27 April 2022
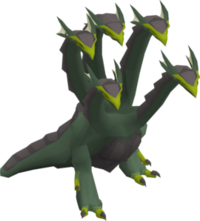
The Alchemical Hydra is a level 95 Slayer boss encountered in the Karuulm Slayer Dungeon. In order to fight it, players must be assigned a hydra task. While the Hydra is in the room, players cannot leave through the doors, as they are jammed when this occurs. Teleports will still work, however. The Hydra has a respawn time of 20 seconds. The hydra has four phases, each one beginning upon hitting or going past each 25% health threshold (~275 health). A head will fall off each time this occurs as the hydra roars and changes forms, signifying the start of the next phase.
The hydra attacks with both Magic and Ranged, with the left heads attacking with magic and the right with ranged. In the first two phases, this consists of two instant hits that deal less damage individually. In the last two phases, this will consist of one hit that does higher individual damage. The hydra will begin the fight with either combat style. Regardless if the hits connect or not for the first three phases and after every three auto-attacks, the hydra will sway its heads backwards as a warning indicator that it is changing combat styles. Players should be aware that the Hydra's phase transition animation can override the attack swapping animation, so counting the attacks is still beneficial.
During the first three phases, the hydra's carapace is strengthened and will immensely reduce incoming damage by 75% of what it would have dealt. This must be removed by luring it to the appropriate chemical vent. If takes chemicals from an incorrect vent, its enrage stack will go up, increasing the damage of its attacks. At the start of each phase, the hydra will perform three auto-attacks before performing a special attack.
Requirements & Recommendataions
Stats
Stats required to kill this boss:
 40+ Prayer for Protection Prayers (95+ recommended for Turmoil, and Soul Split to heal between attacks)
 80+ Range (If using Ranged)
 90+ Attack
 90+ Strength
 95+ Slayer: To attack the boss.
Auras & Relics
- High Alch runes can be helpful to alch unneeded rune drops and increase gp per run.
Fight & Mechanics
The Fight
Hydra has four phases. This section explains how to kill it.
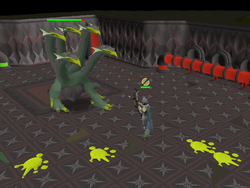
- In this phase, the hydra starts with a green carapace , and should be lured to the red chemical pool. After the first kill, the player should stand right next to the red chemical vat (to the west) so that the Hydra is automatically lured to the red chemical pool as soon as it spawns.
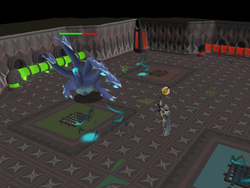
- Now with a blue carapace, the hydra should be lured to the green chemical pool. After the second kill, the player should stand right next to the green chemical vat (to the north ) so that the Hydra is automatically lured to the green chemical pool as soon as it spawns.
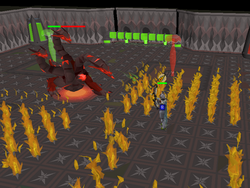
- Now with a red carapace, the hydra should be lured to the blue chemical pool. If the hydra transitions to the next phase while performing this attack, it ends abruptly. This also includes the tracking fire, but any fires started before the phase transition will still persist as usual. For the duration of the side fires, the hydra also becomes a solid NPC, meaning that it is not possible to walk under it.
- The final phase has no counter, and it doesn't need to be lured to any pool. In this phase, the Hydra becomes enraged and has a max hit of 55 making it capable of killing players in a single attack as it deals damage twice.
The Mechanics
Hydra attacks in phases of three, which means that you will always face three ranged attacks into three magic attacks. Therefore, it is useful to count each attack to know when to switch prayers to avoid taking damage.
- In the first phase after the first three attacks, Hydra will fire four poison balls. Players have to move to avoid taking massive damage. After the first special attack, it will repeat doing it after every sixth attack
- For the second phase, after the first three attacks Hydra will launch an electric ball in the centre of the room, which spawns four lightning strikes at the edges of the room that move towards the player. Players can dodge this by moving by the north vat and quickly moving west, which is especially useful if using ranged. Otherwise players have to run around to avoid the attacks.
- Throughout the phase, the hydra will occasionally walk to the centre of the chamber and become un-attackable. Upon reaching the centre, it breathes 5x5 layer of fire to the player's sides based on their location before staring down the middle and launching a tracking fire. This tracking fire follows the player's movement, and travels significantly faster the further the player is (or if they start running). Turning off run and walking in a line as the fire trails is the best course of action. Getting hit by any of the fires will result in the player taking up to 20 damage, followed by a subsequent bleed of 5 damage for five hits. It is highly advised to get Hydra onto the blue chemical pool before she walks to the center to kill her as fast as possible.
- For the final phase Hydra will use the similar special as in the first phase but this time will only fire one poison blob after the first three attacks. Simply dodge it by moving one step in any direction, and pray protection from ranged or magic depending on Hydra's style. Keep in mind she will keep firing one poison blob after every six attacks once it has occured once.
Equipment


