Difference between revisions of "Dagannoth kings"
| (8 intermediate revisions by 2 users not shown) | |||
| Line 10: | Line 10: | ||
{| class="wikitable" cellpadding="0" cellspacing="0" align="center" | {| class="wikitable" cellpadding="0" cellspacing="0" align="center" | ||
|- | |- | ||
! style="text-align: center;" | | ! style="text-align: center;" |Dagannoth Prime | ||
! style="text-align: center;" | | ! style="text-align: center;" |Dagannoth Rex | ||
! style="text-align: center;" | | ! style="text-align: center;" |Dagannoth Supreme | ||
|- | |- | ||
| style="text-align: center;" |Uses | | style="text-align: center;" |Uses Magical Attacks.<br/>[[File:Protect from Magic.png]] | ||
| style="text-align: center;" |Uses | | style="text-align: center;" |Uses Melee Attacks.<br/>[[File:Protect from Melee.png]] | ||
| style="text-align: center;" |Uses | | style="text-align: center;" |Uses Ranged Attacks.<br/>[[File:Protect from Missiles.png]] | ||
|- | |- | ||
|[[File:Dagannoth Prime.png|center|frameless|143x143px]] | |[[File:Dagannoth Prime.png|center|frameless|143x143px]] | ||
| Line 43: | Line 43: | ||
Magic (Rex only)= | Magic (Rex only)= | ||
{| class="wikitable sticky-header" | {| class="wikitable sticky-header" style=text-align:center; | ||
! <center>Slot</center> !! colspan="5"|<center>Item (most effective → least effective) </center> | ! <center>Slot</center> !! colspan="5"|<center>Item (most effective → least effective) </center> | ||
|- | |- | ||
| Line 50: | Line 50: | ||
|[[File:Neck slot.png|center]] || [[File:Arcane stream necklace.png]] Arcane stream necklace || [[File:Saradomin's hiss.png]] Saradomin's hiss || [[File:Occult necklace.png]] Occult necklace || [[File:Arcane blast necklace.png]] Arcane blast necklace || [[File:Amulet of fury.png]] Amulet of fury | |[[File:Neck slot.png|center]] || [[File:Arcane stream necklace.png]] Arcane stream necklace || [[File:Saradomin's hiss.png]] Saradomin's hiss || [[File:Occult necklace.png]] Occult necklace || [[File:Arcane blast necklace.png]] Arcane blast necklace || [[File:Amulet of fury.png]] Amulet of fury | ||
|- | |- | ||
|[[File:Cape slot.png|center]] || [[File: | |[[File:Cape slot.png|center]] || [[File:Completionist cape.png]] Completionists cape || [[File:Max cape.png]] Max cape || [[File:God capes.gif]] God cape || [[File:Capes of accomplishments (trimmed).gif]] || [[File:Mythical cape.png]] Mythical Cape | ||
|- | |- | ||
|[[File:Body slot.png|center]] || [[File:Virtus robe top.png]] Virtus body || [[File:Ancestral robe top.png]] Ancestral robe top || [[File:Ganodermic poncho.png]] Ganodermic poncho || [[File:Zuriel's robe top.png]] Zuriel's robe top || [[File:Garb of subjugation.png]] Garb of subjugation | |[[File:Body slot.png|center]] || [[File:Virtus robe top.png]] Virtus body || [[File:Ancestral robe top.png]] Ancestral robe top || [[File:Ganodermic poncho.png]] Ganodermic poncho || [[File:Zuriel's robe top.png]] Zuriel's robe top || [[File:Garb of subjugation.png]] Garb of subjugation | ||
|- | |- | ||
|[[File:Legs slot.png|center]] || [[File:Virtus robe | |[[File:Legs slot.png|center]] || [[File:Virtus robe legs.png]] Virtus robe legs|| [[File:Ancestral robe bottom.png]] Ancestral robe bottom || [[File:Ganodermic leggings.png]] Ganodermic leggings || [[File:Zuriel's robe bottom.png]] Zuriel's robe bottom || [[File:Gown of subjugation.png]] Gown of subjugation | ||
|- | |- | ||
|[[File:Weapon slot.png|center]] || [[File:Kodai wand.png]] Kodai wand || [[File:Toxic staff of the dead.png]] Toxic staff of the dead || [[File:Chaotic staff.png]] Chaotic staff || [[File:Nightmare staff.png]] Eldritch/Harmonised Nightmare Staff || [[File:Polypore staff.png]] Polypore staff / [[File:Ahrim's staff.png]] Ahrim's staff | |[[File:Weapon slot.png|center]] || [[File:Kodai wand.png]] Kodai wand || [[File:Toxic staff of the dead.png]] Toxic staff of the dead || [[File:Chaotic staff.png]] Chaotic staff || [[File:Nightmare staff.png]] Eldritch/Harmonised Nightmare Staff || [[File:Polypore staff.png]] Polypore staff / [[File:Ahrim's staff.png]] Ahrim's staff | ||
| Line 62: | Line 62: | ||
|[[File:Ammo slot.png|center]] || {{NA}} || {{NA}} || {{NA}} || {{NA}} || {{NA}} | |[[File:Ammo slot.png|center]] || {{NA}} || {{NA}} || {{NA}} || {{NA}} || {{NA}} | ||
|- | |- | ||
|[[File:Hands slot.png|center]] || [[File:Tormented bracelet.png]] || [[File:Virtus gloves.png]] Virtus gloves || [[File:Gloves of subjugation.png]] Gloves of subjugation || [[File:Infinity gloves.png]] Infinity gloves || [[File:Mystic gloves.png]] Mystic gloves | |[[File:Hands slot.png|center]] || [[File:Tormented bracelet.png]] Tormented bracelet || [[File:Virtus gloves.png]] Virtus gloves || [[File:Gloves of subjugation.png]] Gloves of subjugation || [[File:Infinity gloves.png]] Infinity gloves || [[File:Mystic gloves.png]] Mystic gloves | ||
|- | |- | ||
|[[File:Feet slot.png|center]] || [[File:Virtus boots.png]] Virtus boots || [[File:Eternal boots.png]] Eternal boots || [[File:Boots of subjugation.png]] Boots of subjugation || [[File:Ragefire boots.png]] Ragefire boots || [[File:Infinity boots]] Infinity boots | |[[File:Feet slot.png|center]] || [[File:Virtus boots.png]] Virtus boots || [[File:Eternal boots.png]] Eternal boots || [[File:Boots of subjugation.png]] Boots of subjugation || [[File:Ragefire boots.png]] Ragefire boots || [[File:Infinity boots.png]] Infinity boots | ||
|- | |- | ||
|[[File:Ring slot.png|center]] || [[File:Seers ring (i).png]] Seers ring (i) || [[File:Seers ring.png]] Seers ring || {{NA}} || {{NA}} || {{NA}} | |[[File:Ring slot.png|center]] || [[File:Seers ring (i).png]] Seers ring (i) || [[File:Seers ring.png]] Seers ring || {{NA}} || {{NA}} || {{NA}} | ||
| Line 73: | Line 73: | ||
Melee (Supreme only)= | Melee (Supreme only)= | ||
{| class="wikitable sticky-header" | {| class="wikitable sticky-header" style=text-align:center; | ||
! <center>Slot</center> !! colspan="5"|<center>Item (most effective → least effective) </center> | ! <center>Slot</center> !! colspan="5"|<center>Item (most effective → least effective) </center> | ||
|- | |- | ||
|[[File:Head slot.png|center]] || [[File:Slayer helmet (i).png]] Slayer helm (i)<sup>1</sup>|| [[File:Torva full helm.png]] Torva full helm || [[File:Neitiznot faceguard.png]] Neitiznot faceguard || [[File:Statius's full helm.png]] Statius's full helm || [[File:Serpentine helm.png]] Serpentine helm or [[File:Helm of neitiznot.png]] Helm of Neitiznot | |[[File:Head slot.png|center]] || [[File:Slayer helmet (i).png]] Slayer helm (i)<sup>1</sup>|| [[File:Torva full helm.png]] Torva full helm || [[File:Neitiznot faceguard.png]] Neitiznot faceguard || [[File:Statius's full helm.png]] Statius's full helm || [[File:Serpentine helm.png]] Serpentine helm or [[File:Helm of neitiznot.png]] Helm of Neitiznot | ||
|- | |- | ||
|[[File:Neck slot.png|center]] || [[File:Amulet of torture.png]] Amulet of torture || [[File:Amulet of fury.png]] Amulet of fury || [[File:Amulet of glory.png]] Amulet of glory || [[File:Amulet of power.png]] Amulet of power || [[File: | |[[File:Neck slot.png|center]] || [[File:Amulet of torture.png]] Amulet of torture || [[File:Amulet of fury.png]] Amulet of fury || [[File:Amulet of glory.png]] Amulet of glory || [[File:Amulet of power.png]] Amulet of power || [[File:Amulet of strength.png]] Strength amulet | ||
|- | |- | ||
|[[File:Cape slot.png|center]] || [[File:Infernal cape.png]] Infernal cape || [[File:Fire cape.png]] Fire cape || [[File:Max cape.png]] Max cape || [[File:Capes of accomplishments (trimmed).gif]] Cape of accomplishment || [[File:Mythical cape.png]] Mythical cape | |[[File:Cape slot.png|center]] || [[File:Infernal cape.png]] Infernal cape || [[File:Fire cape.png]] Fire cape || [[File:Max cape.png]] Max cape || [[File:Capes of accomplishments (trimmed).gif]] Cape of accomplishment || [[File:Mythical cape.png]] Mythical cape | ||
| Line 86: | Line 86: | ||
|[[File:Legs slot.png|center]] || [[File:Torva platelegs.png]] Torva platelegs || [[File:Statius's platelegs.png]] Statius's platelegs || [[File:Bandos tassets.png]] Bandos tassets || [[File:Dharok's platelegs.png]] Dharok's platelegs (or Barrows platelegs) || [[File:Dragon platelegs.png]] Dragon platelegs | |[[File:Legs slot.png|center]] || [[File:Torva platelegs.png]] Torva platelegs || [[File:Statius's platelegs.png]] Statius's platelegs || [[File:Bandos tassets.png]] Bandos tassets || [[File:Dharok's platelegs.png]] Dharok's platelegs (or Barrows platelegs) || [[File:Dragon platelegs.png]] Dragon platelegs | ||
|- | |- | ||
|[[File:Weapon slot.png|center]] || [[File:Inquisitor's mace.png]] Inquisitor's mace || [[File:Ghrazi rapier.png]] Ghrazi rapier || [[File:Blade of | |[[File:Weapon slot.png|center]] || [[File:Inquisitor's mace.png]] Inquisitor's mace || [[File:Ghrazi rapier.png]] Ghrazi rapier || [[File:Blade of saeldor (c).png]] Blade of Saeldor (c) || [[File:Chaotic rapier.png]] Chaotic rapier || [[File:Abyssal tentacle.png]] Abyssal tentacle / [[File:Abyssal vine whip.png]] Abyssal vine whip / [[File:Abyssal whip.png]] Abyssal whip | ||
|- | |- | ||
|[[File:Shield slot.png|center]] || [[File:Avernic defender.png]] Avernic defender ||[[File: Dragon defender.png]] Dragon defender || [[File:Dragonfire shield.png]] Dragonfire shield || [[File:Rune defender.png]] Rune defender || [[File:Crystal shield.png]] Crystal shield | |[[File:Shield slot.png|center]] || [[File:Avernic defender.png]] Avernic defender ||[[File: Dragon defender.png]] Dragon defender || [[File:Dragonfire shield.png]] Dragonfire shield || [[File:Rune defender.png]] Rune defender || [[File:Crystal shield.png]] Crystal shield | ||
| Line 103: | Line 103: | ||
Ranged (Prime only)= | Ranged (Prime only)= | ||
{| class="wikitable sticky-header" | {| class="wikitable sticky-header" style=text-align:center; | ||
! <center>Slot</center> !! colspan="5"|<center>Item (most effective → least effective) </center> | ! <center>Slot</center> !! colspan="5"|<center>Item (most effective → least effective) </center> | ||
|- | |- | ||
|[[File:Head slot.png|center]] || [[File:Slayer helmet (i).png]] Slayer helm (i)<sup>1</sup> || [[File:Armadyl helmet.png]] Armadyl helmet || [[File:Royal coif.png]] Royal coif || [[File:Serpentine helm.png]] Serpentine helm || [[File:Robin hood hat.png]] Robin hood hat or [[File:Blessed coif.gif]] Blessed coif | |[[File:Head slot.png|center]] || [[File:Slayer helmet (i).png]] Slayer helm (i)<sup>1</sup> || [[File:Armadyl helmet.png]] Armadyl helmet || [[File:Royal dragonhide coif.png]] Royal coif || [[File:Serpentine helm.png]] Serpentine helm || [[File:Robin hood hat.png]] Robin hood hat or [[File:Blessed coif.gif]] Blessed coif | ||
|- | |- | ||
|[[File:Neck slot.png|center]] || [[File:Necklace of anguish.png]] Necklace of anguish || [[File:Saradomin's murmur.png]] Saradomin's murmur || [[File:Amulet of fury.png]] Amulet of fury || [[File:Amulet of glory.png]] Amulet of glory | |[[File:Neck slot.png|center]] || [[File:Necklace of anguish.png]] Necklace of anguish || [[File:Saradomin's murmur.png]] Saradomin's murmur || [[File:Amulet of fury.png]] Amulet of fury || [[File:Amulet of glory.png]] Amulet of glory || {{NA}} | ||
|- | |- | ||
|[[File:Cape slot.png|center]] || [[File:Ava's assembler.png]] Ava's assembler || [[File:Ava's accumulator.png]] Ava's accumulator || [[File:Ranging cape.png]] Ranging cape || [[File:Ava's attractor.png]] Ava's attractor || {{NA}} | |[[File:Cape slot.png|center]] || [[File:Ava's assembler.png]] Ava's assembler || [[File:Ava's accumulator.png]] Ava's accumulator || [[File:Ranging cape.png]] Ranging cape || [[File:Ava's attractor.png]] Ava's attractor || {{NA}} | ||
|- | |- | ||
|[[File:Body slot.png|center]] || [[File:Armadyl chestplate.png]] Armadyl chestplate || [[File:Karil's leathertop.png]] Karil's leathertop || [[File:Royal | |[[File:Body slot.png|center]] || [[File:Armadyl chestplate.png]] Armadyl chestplate || [[File:Karil's leathertop.png]] Karil's leathertop || [[File:Royal dragonhide body.png]] Royal d'hide body || [[File:Blessed body.gif]] Blessed body || [[File:Black d'hide body.png]] Black d'hide body | ||
|- | |- | ||
|[[File:Legs slot.png|center]] || [[File:Armadyl chainskirt.png]] Armadyl chainskirt || [[File:Karil's leatherskirt.png]] Karil's leatherskirt || [[File:Royal | |[[File:Legs slot.png|center]] || [[File:Armadyl chainskirt.png]] Armadyl chainskirt || [[File:Karil's leatherskirt.png]] Karil's leatherskirt || [[File:Royal dragonhide chaps.png]] Royal d'hide chaps || [[File:Blessed chaps.gif]] Blessed chaps || [[File:Black d'hide chaps.png]] Black d'hide chaps | ||
|- | |- | ||
|[[File:Weapon slot.png|center]] || [[File:Toxic blowpipe.png]] Toxic blowpipe || [[File:Zaryte crossbow.png]] Zaryte crossbow|| [[File:Chaotic crossbow.png]] Chaotic crossbow || [[File:Dragon crossbow.png]] Dragon crossbow or [[File:Rune crossbow.png]] Rune Crossbow | |[[File:Weapon slot.png|center]] || [[File:Toxic blowpipe.png]] Toxic blowpipe || [[File:Zaryte crossbow.png]] Zaryte crossbow|| [[File:Chaotic crossbow.png]] Chaotic crossbow || [[File:Dragon crossbow.png]] Dragon crossbow or [[File:Rune crossbow.png]] Rune Crossbow || {{NA}} | ||
|- | |- | ||
|[[File:Shield slot.png|center]] || [[File:Eagle-eye_kiteshield.png]] Eagle-eye kiteshield || [[File:Dragonfire ward.png]] Dragonfire ward || [[File:Twisted buckler.png]] Twisted buckler || [[File:Crystal shield.png]] Crystal shield || [[File:Holy book.png]] God book | |[[File:Shield slot.png|center]] || [[File:Eagle-eye_kiteshield.png]] Eagle-eye kiteshield || [[File:Dragonfire ward.png]] Dragonfire ward || [[File:Twisted buckler.png]] Twisted buckler || [[File:Crystal shield.png]] Crystal shield || [[File:Holy book.png]] God book | ||
| Line 122: | Line 122: | ||
|[[File:Ammo slot.png|center]] || | [[File:Ruby dragon bolts (e) 5.png]] Ruby dragon bolts (e) + [[File:Diamond dragon bolts (e) 5.png]] Diamond dragon bolts (e) || [[File:Ruby bolts (e) 5.png]] Ruby bolts (e) + [[File:Diamond_bolts_5.png ]] Diamond bolts (e) || {{NA}} || {{NA}} || {{NA}} | |[[File:Ammo slot.png|center]] || | [[File:Ruby dragon bolts (e) 5.png]] Ruby dragon bolts (e) + [[File:Diamond dragon bolts (e) 5.png]] Diamond dragon bolts (e) || [[File:Ruby bolts (e) 5.png]] Ruby bolts (e) + [[File:Diamond_bolts_5.png ]] Diamond bolts (e) || {{NA}} || {{NA}} || {{NA}} | ||
|- | |- | ||
|[[File:Hands slot.png|center]] || [[File:Swift gloves (black).png]] Swift gloves || [[File:Zaryte vambraces.png]] Zaryte vambraces || [[File:Barrows gloves.png]] Barrows gloves || [[File:Black d'hide vambraces.png]] Black d'hide vambraces | |[[File:Hands slot.png|center]] || [[File:Swift gloves (black).png]] Swift gloves || [[File:Zaryte vambraces.png]] Zaryte vambraces || [[File:Barrows gloves.png]] Barrows gloves || [[File:Black d'hide vambraces.png]] Black d'hide vambraces || {{NA}} | ||
|- | |- | ||
|[[File:Feet slot.png|center]] || [[File:Pegasian boots.png]] Pegasian boots || [[File:Glaiven boots.png]] Glavien boots || [[File:Ranger boots.png]] Ranger boots || [[File:Blessed boots.gif]] Blessed boots || [[File:Boots of brimstone.png]] Boots of brimstone | |[[File:Feet slot.png|center]] || [[File:Pegasian boots.png]] Pegasian boots || [[File:Glaiven boots.png]] Glavien boots || [[File:Ranger boots.png]] Ranger boots || [[File:Blessed boots.gif]] Blessed boots || [[File:Boots of brimstone.png]] Boots of brimstone | ||
| Line 133: | Line 133: | ||
Tribrid (Solo)= | Tribrid (Solo)= | ||
A tribrid setup means a single player using Magic, Ranged and Melee to kill all three Dagannoth Kings. It is only recommended for people who can afford good enough equipment to be able to '''kill all Kings fast enough'''. If the player is not experienced, an alternative to attacking all three kings is to have another person targeting Rex, while the player targets Prime and Supreme. The person targeting Rex may help defeat Prime/Supreme if needed. | A tribrid setup means a single player using Magic, Ranged and Melee to kill all three Dagannoth Kings. It is only recommended for people who can afford good enough equipment to be able to '''kill all Kings fast enough'''. If the player is not experienced, an alternative to attacking all three kings is to have another person targeting Rex, while the player targets Prime and Supreme. The person targeting Rex may help defeat Prime/Supreme if needed. | ||
<br> | <br><br> | ||
Enter with Protect from Magic activated, and get Supreme as close to the ladder as possible before killing him with Piety; if Prime is a safe distance away and Supreme is very close to the ladder, you can use Protect from Missiles. This can be done by climbing the ladder up and down until he has been lured. (Otherwise, Prime will aggro you, necessitating Protect from Magic and tanking Supreme's hits, which will drain your supplies.) Afterwards, safespot and kill Rex, and since Prime will be on you, keep Protect from Magic on. Lastly, go north-east and kill Prime. The optimal spot to kill him is denoted by rocks on the ground in triangle formation. | Enter with Protect from Magic activated, and get Supreme as close to the ladder as possible before killing him with Piety; if Prime is a safe distance away and Supreme is very close to the ladder, you can use Protect from Missiles. This can be done by climbing the ladder up and down until he has been lured. (Otherwise, Prime will aggro you, necessitating Protect from Magic and tanking Supreme's hits, which will drain your supplies.) Afterwards, safespot and kill Rex, and since Prime will be on you, keep Protect from Magic on. Lastly, go north-east and kill Prime. The optimal spot to kill him is denoted by rocks on the ground in triangle formation. | ||
<br> | <br><br> | ||
An alternate strategy is to follow the same procedure up to Prime (i.e. kill Supreme and then Rex), but get him to as low health as possible, then wait in the east for Rex to respawn. Kill Rex again, finish off Prime, then go kill Supreme. | An alternate strategy is to follow the same procedure up to Prime (i.e. kill Supreme and then Rex), but get him to as low health as possible, then wait in the east for Rex to respawn. Kill Rex again, finish off Prime, then go kill Supreme. | ||
{| class="wikitable sticky-header" | {| class="wikitable sticky-header" style=text-align:center; | ||
! <center>Slot</center> !! colspan="5"|<center>Item (most effective → least effective) </center> | ! <center>Slot</center> !! colspan="5"|<center>Item (most effective → least effective) </center> | ||
|- | |- | ||
| Line 146: | Line 146: | ||
|[[File:Cape slot.png|center]] || [[File:Ava's assembler.png]] Ava's assembler or [[File:Infernal cape.png]] Infernal cape || [[File:Fire cape.png]] Fire cape or [[File:Ranging cape.png]] Ranging cape || [[File:Ava's attractor.png]] Ava's attractor || {{NA}} || {{NA}} | |[[File:Cape slot.png|center]] || [[File:Ava's assembler.png]] Ava's assembler or [[File:Infernal cape.png]] Infernal cape || [[File:Fire cape.png]] Fire cape or [[File:Ranging cape.png]] Ranging cape || [[File:Ava's attractor.png]] Ava's attractor || {{NA}} || {{NA}} | ||
|- | |- | ||
|[[File:Body slot.png|center]] || [[File:Torva platebody.png]] Torva platebody + [[File:Pernix body.png]] Pernix body ||[[File:Bandos chestplate.png]] Bandos chestplate + [[File:Armadyl chestplate.png]] Armadyl chestplate || [[File:Dharok's platebody.png]] Dharok's platebody + [[File:Karil's leathertop.png]] Karil's leathertop || [[File:Rune platebody.png]] Rune platebody + [[File:Royal | |[[File:Body slot.png|center]] || [[File:Torva platebody.png]] Torva platebody + [[File:Pernix body.png]] Pernix body ||[[File:Bandos chestplate.png]] Bandos chestplate + [[File:Armadyl chestplate.png]] Armadyl chestplate || [[File:Dharok's platebody.png]] Dharok's platebody + [[File:Karil's leathertop.png]] Karil's leathertop || [[File:Rune platebody.png]] Rune platebody + [[File:Royal dragonhide body.png]] Royal d'hide body || {{NA}} | ||
|- | |- | ||
|[[File:Legs slot.png|center]] || [[File:Torva platelegs.png]] Torva platelegs + [[File:Pernix chaps.png]] Pernix chaps || [[File:Bandos tassets.png]] Bandos tassets + [[File:Armadyl chainskirt.png]] Armadyl chainskirt || [[File:Dharok's platelegs.png]] Dharok's platelegs + [[File:Karil's leatherskirt.png]] Karil's leatherskirt || [[File: Dragon platelegs.png]] Dragon platelegs + [[File:Royal | |[[File:Legs slot.png|center]] || [[File:Torva platelegs.png]] Torva platelegs + [[File:Pernix chaps.png]] Pernix chaps || [[File:Bandos tassets.png]] Bandos tassets + [[File:Armadyl chainskirt.png]] Armadyl chainskirt || [[File:Dharok's platelegs.png]] Dharok's platelegs + [[File:Karil's leatherskirt.png]] Karil's leatherskirt || [[File: Dragon platelegs.png]] Dragon platelegs + [[File:Royal dragonhide chaps.png]] Royal d'hide chaps || {{NA}} | ||
|- | |- | ||
|[[File:Weapon slot.png|center]] || [[File:Inquisitor's mace.png]] Inquisitor's mace + [[File:Twisted bow.png]] Twisted bow + [[File:Sanguinesti staff.png]] Sanguinesti staff || [[File:Blade of saeldor (c).png]] Blade of saeldor (c) + [[File:Bow of faerdhninen (c).png]] Bow of faerdhinen (c) + [[File:Trident of the swamp.png]] Trident of the swamp || [[File:Chaotic rapier.png] Chaotic rapier + [[File:Chaotic staff.png]] Chaotic staff + [[File:Chaotic crossbow.png]] || [[File:Abyssal tentacle.png]] Abyssal tentacle + [[File:Toxic blowpipe.png]] Toxic blowpipe + [[File: Trident of the seas.png]] Trident of the seas || {{NA}} | |[[File:Weapon slot.png|center]] || [[File:Inquisitor's mace.png]] Inquisitor's mace + [[File:Twisted bow.png]] Twisted bow + [[File:Sanguinesti staff (uncharged).png]] Sanguinesti staff || [[File:Blade of saeldor (c).png]] Blade of saeldor (c) + [[File:Bow of faerdhninen (c).png]] Bow of faerdhinen (c) + [[File:Trident of the swamp.png]] Trident of the swamp || [[File:Chaotic rapier.png] Chaotic rapier + [[File:Chaotic staff.png]] Chaotic staff + [[File:Chaotic crossbow.png]] || [[File:Abyssal tentacle.png]] Abyssal tentacle + [[File:Toxic blowpipe.png]] Toxic blowpipe + [[File: Trident of the seas.png]] Trident of the seas || {{NA}} | ||
|- | |- | ||
|[[File:Shield slot.png|center]] || [[File:Avernic defender.png]] Avernic defender || [[File:Dragon defender.png]] Dragon defender || [[File:Dragonfire shield.png]] Dragonfire shield || [[File:Crystal shield.png]] Crystal shield || {{NA}} | |[[File:Shield slot.png|center]] || [[File:Avernic defender.png]] Avernic defender || [[File:Dragon defender.png]] Dragon defender || [[File:Dragonfire shield.png]] Dragonfire shield || [[File:Crystal shield.png]] Crystal shield || {{NA}} | ||
Latest revision as of 03:30, 26 November 2022
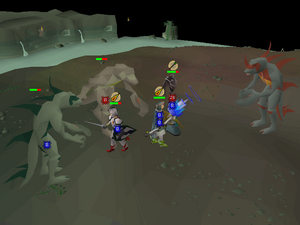
Dagannoth Kings are a trio of bosses found in the Waterbirth Island Dungeon, known for their dragon axe, berserker ring, archers ring, warrior ring and seers ring drops. Their bones are also valuable, making them consistently rewarding to kill.
The Kings
The Kings reside on the sixth floor (the deepest) in Waterbirth Island Dungeon.
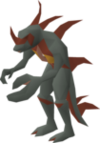
- Dagannoth Prime: The Dagannoth King who uses magical attacks. Whenever he is attacking, Protect from Magic must be on at all costs as Prime can hit up to 50 damage and easily kill in two hits. Prime is weak to ranged attacks.
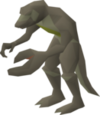
- Dagannoth Rex: The Dagannoth King who uses melee attacks. He is extremely easy to deal with, as he can be either binded or lured to the edges of the islet where he can get stuck easily.
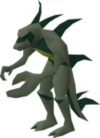
- Dagannoth Supreme: The Dagannoth King who uses ranged attacks. Supreme is also easy to deal with, hitting harder than Rex but lower than Prime. Supreme's attacks can hit multiple players if they are facing his direction.
| Dagannoth Prime | Dagannoth Rex | Dagannoth Supreme |
|---|---|---|
| Uses Magical Attacks. |
Uses Melee Attacks. |
Uses Ranged Attacks. |
| Fight with Ranged | Fight with Magic | Fight with Melee |
Suggested Skills
 70+
70+  70+
70+  75+
75+  70+
70+  60+ (80+ Recommended)
 70+
70+  45+ (Mystic Might,70+ Piety)
Equipment
Prayer bonus is essential for Dagannoth Kings, and setups differ from player to player. It is best to try out DKs with another person and limit risk. Once you are comfortable, you will be able to modify your setup to your own style. It is recommended to prioritize ranged defence over melee and magical defence when choosing your armour. Prayer bonus should be your second priority after ranged defence.
- If you have a Dagannoth slayer task
| N/A | |||||
| N/A | |||||
| N/A | |||||
| N/A | N/A | N/A | |||
| N/A | |||||
| File:Crystal spear.png Crystal spear | |||||
A tribrid setup means a single player using Magic, Ranged and Melee to kill all three Dagannoth Kings. It is only recommended for people who can afford good enough equipment to be able to kill all Kings fast enough. If the player is not experienced, an alternative to attacking all three kings is to have another person targeting Rex, while the player targets Prime and Supreme. The person targeting Rex may help defeat Prime/Supreme if needed.
Enter with Protect from Magic activated, and get Supreme as close to the ladder as possible before killing him with Piety; if Prime is a safe distance away and Supreme is very close to the ladder, you can use Protect from Missiles. This can be done by climbing the ladder up and down until he has been lured. (Otherwise, Prime will aggro you, necessitating Protect from Magic and tanking Supreme's hits, which will drain your supplies.) Afterwards, safespot and kill Rex, and since Prime will be on you, keep Protect from Magic on. Lastly, go north-east and kill Prime. The optimal spot to kill him is denoted by rocks on the ground in triangle formation.
An alternate strategy is to follow the same procedure up to Prime (i.e. kill Supreme and then Rex), but get him to as low health as possible, then wait in the east for Rex to respawn. Kill Rex again, finish off Prime, then go kill Supreme.
| File:Helm of Neitiznot.png Helm of Neitiznot | |||||
| N/A | |||||
| N/A | N/A | ||||
| N/A | |||||
| N/A | |||||
| [[File:Chaotic rapier.png] Chaotic rapier + |
N/A | ||||
| N/A | |||||
| N/A | N/A | N/A | N/A | ||
| N/A | N/A | N/A | N/A | ||
| N/A | |||||


