Difference between revisions of "General Graardor"
Jump to navigation
Jump to search
Toxicity101 (talk | contribs) |
(remove broken linked items) |
||
| (16 intermediate revisions by 5 users not shown) | |||
| Line 1: | Line 1: | ||
[[File:General graador title.gif|400px|right]] | |||
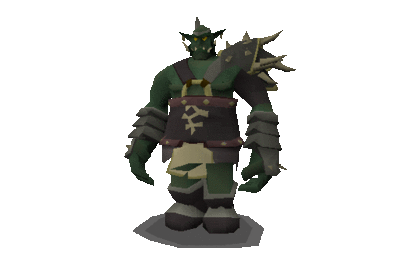
Killing General Graador is a pretty simple task once you learn his basic attacks. | |||
== Stats, Equipment, and Inventory == | |||
<big>'''Stats Required to follow this guide:'''</big> | |||
* {{SCP|Prayer}}74+ Prayer for Piety or for Rigour if you're using Range. (94+ recommended for Turmoil, and Soul Split to heal off of Graador's minions.) | |||
* {{SCP|Ranged}}90+ Range (If using Ranged.) | |||
* {{SCP|Strength}}80+ Strength | |||
* {{SCP|Attack}}80+ Attack | |||
* {{SCP|Defence}}80+ Defence: To tank Melee/Range minion attacks | |||
90+ | * {{SCP|Summoning}}88+ Summoning for the Unicorn Stallion summon for extra healing while solo or tanking. (96+ Summoning is recommended for duos for a Pack Yak to carry extra supplies for a longer runs.) | ||
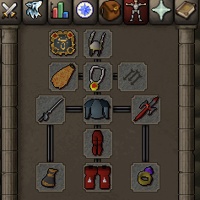
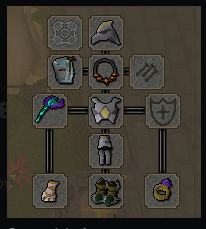
<big>Example Gear Setup:</big> | |||
96+ Summoning | |||
{| class="wikitable" | {| class="wikitable" | ||
|+ The | |+ The Setup | ||
|- | |- | ||
! [[File:1.jpg|400px|thumb|Melee Setup]] !! [[File:2.png|400px|thumb|Range Setup]] !! [[File:3.png|200px|thumb|Inventory Setup]] | ! [[File:1.jpg|400px|thumb|Melee Setup]] !! [[File:2.png|400px|thumb|Range Setup]] !! [[File:3.png|200px|thumb|Inventory Setup]] | ||
|} | |} | ||
<tabber> | |||
Melee Setup= | |||
{| class="wikitable" | |||
|+ Best Melee Setup | |||
|- | |||
! Slot !! Best !! Better !! Good !! Alternative | |||
|- | |||
| Head || [[File:torva_full_helm.png|30px|Torva Full Helm]] || [[File:serpentine_helm.png|30px|Serpentine Helm]] || [[File:helm_of_neitiznot.png|30px|Helm of Neitiznot]] || | |||
|- | |||
| Neck || [[File:amulet_of_torture.png|30px|Amulet of Torture]] || [[File:amulet_of_fury.png|30px|Amulet of Fury]] || || | |||
|- | |||
| Cape || [[File:infernal_cape.png|30px|Infernal Cape]] || [[File:fire_cape.png|30px|Fire Cape]] || [[File:max_cape.png|30px|Max Cape]] || | |||
|- | |||
| Body || [[File:torva_platebody.png|30px|Torva Platebody]] || [[File:bandos_chestplate.png|30px|Bandos Chestplate]] || [Dharok's Platebody] || | |||
|- | |||
| Legs || [[File:torva_platelegs.png|30px|Torva Platelegs]] || [[File:bandos_tassets.png|30px|Bandos Tassets]] || [Dharok's Platelegs] || | |||
|- | |||
| Weapon || [[File:scythe_of_vitur.png|30px|Scythe of Vitur]] || [[File:ghrazi_rapier.png|30px|Ghrazi Rapier]] || || | |||
|- | |||
| Shield || [[File:elysian_spirit_shield.png|30px|Elysian Spirit Shield]] || [[File:dragon_defender.png|30px|Dragon Defender]] || || | |||
|- | |||
| Hands || [[File:ferocious_gloves.png|30px|Ferocious Gloves]] || [[File:barrows_gloves.png|30px|Barrows Gloves]] || || | |||
|- | |||
| Feet || [[File:guardian_boots.png|30px|Guardian Boots]] || [[File:primordial_boots.png|30px|Primordial Boots]] || || | |||
|- | |||
| Ring || [[File:berserker_ring.png|30px|Berserker Ring (i)]] || [[File:ring_of_suffering.png|30px|Ring of Suffering (i)]] || || | |||
|} | |||
{| class="wikitable" | |||
|+ Pet Perks for Melee | |||
|- | |||
| 1. Specialist | |||
|- | |||
| 2. Absolute Unit | |||
|- | |||
| 3. Brawler | |||
|} | |||
|-|Range Setup= | |||
= | {| class="wikitable" | ||
|+ Best Range Setup | |||
|- | |||
! Slot !! Best !! Better !! Good !! Alternative | |||
|- | |||
| Head || [[File:pernix_cowl.png|30px|Pernix Cowl]] || [[File:armadyl_helmet.png|30px|Armadyl Helmet]] || || | |||
|- | |||
| Neck || [[File:necklace_of_anguish.png|30px|Necklace of Anguish]] || [[File:amulet_of_fury.png|30px|Amulet of Fury]] || || | |||
|- | |||
| Cape || [[File:avas_assembler.png|30px|Ava's Assembler]] || [[File:ranging_cape.png|30px|Ranging Cape]] || || | |||
|- | |||
| Body || [[File:armadyl_chestplate.png|30px|Armadyl Chestplate]] || [[File:karils_leathertop.png|30px|Karil's Leathertop]] || || | |||
|- | |||
| Legs || [[File:armadyl_chainskirt.png|30px|Armadyl Chainskirt]] || [[File:karils_leatherskirt.png|30px|Karil's Leatherskirt]] || || | |||
|- | |||
| Weapon || [[File:twisted_bow.png|30px|Twisted Bow]] || [[File:dragon_hunter_crossbow.png|30px|Dragon Hunter Crossbow]] || || | |||
|- | |||
| Shield || [[File:twisted_buckler.png|30px|Twisted Buckler]] || [[File:dragonfire_ward.png|30px|Dragonfire Ward]] || || | |||
|- | |||
| Hands || [[File:zaryte_vambraces.png|30px|Zaryte Vambraces]] || [[File:barrows_gloves.png|30px|Barrows Gloves]] || || | |||
|- | |||
| Feet || [[File:pegasian_boots.png|30px|Pegasian Boots]] || [[File:ranger_boots.png|30px|Ranger Boots]] || || | |||
|- | |||
| Ring || [[File:archers_ring.png|30px|Archers' Ring (i)]] || [[File:ring_of_suffering.png|30px|Ring of Suffering (i)]] || || | |||
|} | |||
{| class="wikitable" | |||
|+ Pet Perks for Range | |||
|- | |||
| 1. Sharpshooter | |||
|- | |||
| 2. Soul Siphon | |||
|- | |||
| 3. Resilience | |||
|} | |||
|-|Mage Setup= | |||
{| class="wikitable" | |||
[[File: | |+ Best Mage Setup | ||
|- | |||
! Slot !! Best !! Better !! Good !! Alternative | |||
|- | |||
| Head || [[File:ancestral_hat.png|30px|Ancestral Hat]] || [[File:ahrims_hood.png|30px|Ahrim's Hood]] || [[File:mystic_hat.png|30px|Mystic Hat]] || | |||
|- | |||
| Neck || [[File:occult_necklace.png|30px|Occult Necklace]] || [[File:amulet_of_fury.png|30px|Amulet of Fury]] || [[File:mystic_amulet.png|30px|Mystic Amulet]] || | |||
|- | |||
| Cape || [[File:imbued_god_cape.png|30px|Imbued God Cape]] || [[File:god_cape.png|30px|God Cape]] || [[File:cloak_of_guthix.png|30px|Cloak of Guthix]] || | |||
|- | |||
| Body || [[File:ancestral_robe_top.png|30px|Ancestral Robe Top]] || [[File:ahrims_robetop.png|30px|Ahrim's Robetop]] || [[File:mystic_robetop.png|30px|Mystic Robetop]] || | |||
|- | |||
| Legs || [[File:ancestral_robe_bottom.png|30px|Ancestral Robe Bottom]] || [[File:ahrims_robeskirt.png|30px|Ahrim's Robeskirt]] || [[File:mystic_robebottom.png|30px|Mystic Robebottom]] || | |||
|- | |||
| Weapon || [[File:sanguinesti_staff.png|30px|Sanguinesti Staff]] || [[File:kodai_wand.png|30px|Kodai Wand]] || [[File:trident_of_the_swamp.png|30px|Trident of the Swamp]] || | |||
|- | |||
| Shield || [[File:arcane_spirit_shield.png|30px|Arcane Spirit Shield]] || [[File:malediction_ward.png|30px|Malediction Ward]] || [[File:unholy_book.png|30px|Unholy Book]] || | |||
|- | |||
| Hands || [[File:tormented_bracelet.png|30px|Tormented Bracelet]] || [[File:barrows_gloves.png|30px|Barrows Gloves]] || [[File:mystic_gloves.png|30px|Mystic Gloves]] || | |||
|- | |||
| Feet || [[File:eternal_boots.png|30px|Eternal Boots]] || [[File:ahrims_boots.png|30px|Ahrim's Boots]] || [[File:mystic_boots.png|30px|Mystic Boots]] || | |||
|- | |||
| Ring || [[File:seers_ring.png|30px|Seers' Ring (i)]] || [[File:ring_of_the_gods.png|30px|Ring of the Gods]] || [[File:magic_imbue.png|30px|Magic Imbue]] || | |||
|} | |||
{| class="wikitable" | |||
|+ Pet Perks for Mage | |||
|- | |||
| 1. Runic Accuracy | |||
|- | |||
| 2. Soul Siphon | |||
|- | |||
| 3. Torment | |||
|} | |||
</tabber> | |||
<big>'''Relics and Auras'''</big> | |||
Your | {| | ||
|+ | |||
|- | |||
| [[File:Silver Divinity.png|32px|center]] || '''Divinity''' (Silver) Your prayer points drain 10% slower. | |||
|- | |||
| [[File:Silver Overclocked.png|32px|center]] || '''Overclocked''' (Silver) Aura cooldown is reduced by 20% and auras last 10% longer. | |||
|- | |||
| [[File:Gold StringOfLuck.png|32px|center]] || '''String of Luck''' (Gold) Offers a 10% luck boost (excludes raids). | |||
|- | |||
| [[File:Gold StrokeOfLuck.png|32px|center]] || '''Stroke of Luck''' (Gold) Offers a 10% chance to double monster drop loot. | |||
|- | |||
| [[File:Gold CatchEmAll.png|32px|center]] || '''Catch em All''' (Gold) Offers 50% higher drop rate on all pets. (if pet hunting) | |||
|- | |||
| [[File:Master reverence aura.png]] || '''Master Reverence''' - Slows down prayer drain and increases prayer restoration from potions by 7%. | |||
|- | |||
| [[File:Vampyrism aura.png]] || '''Vampyrism''' - Gain life points equal to 5% of any damage you deal. | |||
|- | |||
|[[File:penance aura.png]] || '''Penance''' - Gain prayer points equal to 5% of any damage you receive. | |||
|- | |||
|} | |||
* High Alch runes can be helpful to alch unneeded rune drops and increase gp per run. | |||
* Runes for casting Bones to Peaches can be helpful to extend trips. | |||
<br clear=all> | |||
== Getting There (& Killcount) == | |||
*General Graardor is accessed from the teleport Nexus at ;;home under PVM -> Bosses -> Page 2 | |||
*Killing Bandos-aligned minions is required to access the Boss room. The minimap on the picture shows two areas in which it is easy to obtain the required killcount from a group of goblins. Do not teleport out before facing the boss or your killcount will be reset. | |||
{| | |||
|+ | |||
|- | |||
| [[File:General Graador nexus.png|500px]]|| [[File:6.png|500px|]] | |||
|} | |||
= | *Once your required Killcount has been acquired, bang the door near where the inital teleport landed. | ||
<br clear=all> | |||
== Boss Fight == | |||
=== Duos or Groups === | |||
The tank of the group will take and hold aggro, and focus on prayer flicking while the DPS will prayer Protect/Deflect from Ranged and focus down the boss. | |||
=== Solo === | |||
*The pray flick is the most important mechanic while tanking in the fight with General Graardor. When his hands go up quickly flick your prayer from Protect/Deflect from Melee to Protect/Deflect from Ranged and then back to Protect/Deflect from Melee. In between kills, heal off the minions while leaving one alive to kill after Graador respawns, to reduce the damage you'll take during the kill itself. | |||
*A demonstration of a player prayer flicking General Graador's attacks: [https://gyazo.com/dcea23c8a7b53385368a7cb6ae4216f7 GIF] | |||
== Infinite trip == | |||
*Using Soul Split and wearing Guthan the Infested's set will allow you to heal off of the minion during the downtime between the boss respawn timer and Graador and his minions will drop various food and prayer restoring items. It is possible to stay at this boss indefinitely with practice, especially with Bones to Peaches. | |||
*Demonstration of healing on minions: [https://gyazo.com/471d5c66c1510e22e15caf0c394f647b GIF] | |||
*If you enter a private instance the boss respawn timer will be quicker which can help speed up kills as you become more skilled in fighting General Graardor. | |||
Latest revision as of 18:55, 4 August 2024
Killing General Graador is a pretty simple task once you learn his basic attacks.
Stats, Equipment, and Inventory
Stats Required to follow this guide:
 74+ Prayer for Piety or for Rigour if you're using Range. (94+ recommended for Turmoil, and Soul Split to heal off of Graador's minions.)
 90+ Range (If using Ranged.)
 80+ Strength
 80+ Attack
 80+ Defence: To tank Melee/Range minion attacks
 88+ Summoning for the Unicorn Stallion summon for extra healing while solo or tanking. (96+ Summoning is recommended for duos for a Pack Yak to carry extra supplies for a longer runs.)
Example Gear Setup:
| Slot | Best | Better | Good | Alternative |
|---|---|---|---|---|
| Head | ||||
| Neck | ||||
| Cape | ||||
| Body | [Dharok's Platebody] | |||
| Legs | [Dharok's Platelegs] | |||
| Weapon | ||||
| Shield | ||||
| Hands | ||||
| Feet | ||||
| Ring |
| 1. Specialist |
| 2. Absolute Unit |
| 3. Brawler |
| Slot | Best | Better | Good | Alternative |
|---|---|---|---|---|
| Head | ||||
| Neck | ||||
| Cape | Ava's Assembler | |||
| Body | Karil's Leathertop | |||
| Legs | Karil's Leatherskirt | |||
| Weapon | ||||
| Shield | ||||
| Hands | ||||
| Feet | ||||
| Ring |
| 1. Sharpshooter |
| 2. Soul Siphon |
| 3. Resilience |
| Slot | Best | Better | Good | Alternative |
|---|---|---|---|---|
| Head | Ahrim's Hood | |||
| Neck | Mystic Amulet | |||
| Cape | Imbued God Cape | God Cape | Cloak of Guthix | |
| Body | Ahrim's Robetop | Mystic Robetop | ||
| Legs | Ahrim's Robeskirt | Mystic Robebottom | ||
| Weapon | Sanguinesti Staff | |||
| Shield | ||||
| Hands | ||||
| Feet | Ahrim's Boots | |||
| Ring | Magic Imbue |
| 1. Runic Accuracy |
| 2. Soul Siphon |
| 3. Torment |
Relics and Auras
- High Alch runes can be helpful to alch unneeded rune drops and increase gp per run.
- Runes for casting Bones to Peaches can be helpful to extend trips.
Getting There (& Killcount)
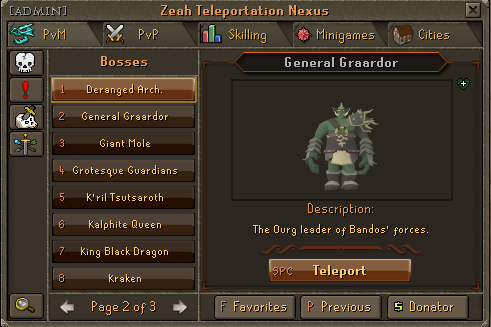
- General Graardor is accessed from the teleport Nexus at ;;home under PVM -> Bosses -> Page 2
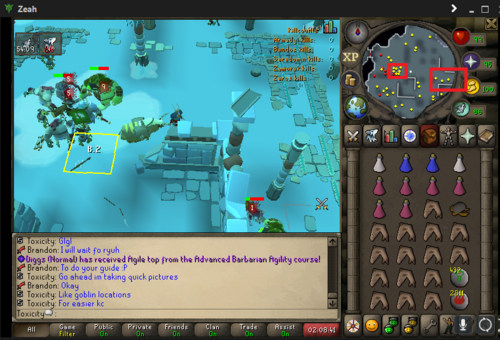
- Killing Bandos-aligned minions is required to access the Boss room. The minimap on the picture shows two areas in which it is easy to obtain the required killcount from a group of goblins. Do not teleport out before facing the boss or your killcount will be reset.
 |
|
- Once your required Killcount has been acquired, bang the door near where the inital teleport landed.
Boss Fight
Duos or Groups
The tank of the group will take and hold aggro, and focus on prayer flicking while the DPS will prayer Protect/Deflect from Ranged and focus down the boss.
Solo
- The pray flick is the most important mechanic while tanking in the fight with General Graardor. When his hands go up quickly flick your prayer from Protect/Deflect from Melee to Protect/Deflect from Ranged and then back to Protect/Deflect from Melee. In between kills, heal off the minions while leaving one alive to kill after Graador respawns, to reduce the damage you'll take during the kill itself.
- A demonstration of a player prayer flicking General Graador's attacks: GIF
Infinite trip
- Using Soul Split and wearing Guthan the Infested's set will allow you to heal off of the minion during the downtime between the boss respawn timer and Graador and his minions will drop various food and prayer restoring items. It is possible to stay at this boss indefinitely with practice, especially with Bones to Peaches.
- Demonstration of healing on minions: GIF
- If you enter a private instance the boss respawn timer will be quicker which can help speed up kills as you become more skilled in fighting General Graardor.
