Difference between revisions of "Chambers of Xeric/Strategies"
| Line 55: | Line 55: | ||
Deposit your brews in the chest and chop the tree. Take the kindling and light the Brazier's. Repeat until his health bar depletes at which point he'll thaw and come out for the fight. Don't forget to take your brews back out. | Deposit your brews in the chest and chop the tree. Take the kindling and light the Brazier's. Repeat until his health bar depletes at which point he'll thaw and come out for the fight. Don't forget to take your brews back out. | ||
=== | === Vanguards === | ||
=== Thieving Room === | |||
=== | === Vespula === | ||
=== Tightrope === | |||
=== Guardians === | |||
=== Vasa Nistirio === | |||
=== Skeletal Mystics === | |||
=== Muttadiles === | |||
=== The Great Olm === | |||
==Equipment== | ==Equipment== | ||
Revision as of 13:53, 7 April 2025
This is a strategy guide for completing the Chambers of Xeric.
- Full page rework incoming
Getting There
The easiest way to get to the Chambers of Xeric is by using the Portal Nexus at ::home.
Recommended Equipment
Table to be added
Auras and Pet Perks
Info to be added
Bosses and Puzzles
Tekton
Tekton is weak to Melee Crush attacks, immune to Ranged and highly resistant to Magic.
He has very high defence stats, so using a Dragon or Statius' Warhammer or the Elder Mail special attack is beneficial.
He will turn to face a player and will attack in that direction, so move to his sides and attack. Protect from Melee will mitigate some damage.
If not killed quickly, Tekon will retreat to his anvil and reforge his body, boosting his health and damage output.
Jewelled Crabs
This room can be skipped with a Crab Skip Card.
You must use the crabs to reflect the white orb firing from the wall into the corresponding crystal. A Crab can be locked in place for 20-30 seconds by using the right click Smash option.
Attacking a Crab with combat styles will turn it into the corresponding colour, which will turn the white orb into that colour. The crab will revert back to its default colour after some time.
The orb reflects off crabs West, North, East and then South.
Ranged is used on the Purple crystal. Melee is used on the Blue crystal. Magic is used in the Yellow crystal. Nothing is used on the Black crystal.
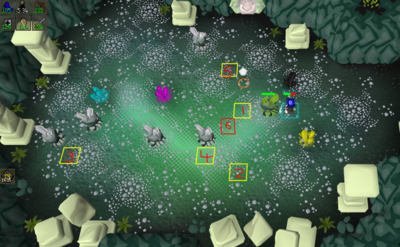
An example with reference to the screenshot:
- Hit a Crab with a ranged attack and position it on tile 1.
- Smash it on tile 2. Have another crab and take it to position 3, hit it with melee.
- Take this crab (or another if you smashed) to position 4 and smash it. You may have to re-smash the crab on tile 2.
- Hit a Crab with Magic and position it on 6.
- After the Blue crystal is hit, take it north to tile 5and smash it. You may have to re-smash your crabs on 2 and 4.
Ice Demon
Pray range and use range or mage to kill. Mage especially if using Double Cast.
Deposit your brews in the chest and chop the tree. Take the kindling and light the Brazier's. Repeat until his health bar depletes at which point he'll thaw and come out for the fight. Don't forget to take your brews back out.
Vanguards
Thieving Room
Vespula
Tightrope
Guardians
Vasa Nistirio
Skeletal Mystics
Muttadiles
The Great Olm
Equipment
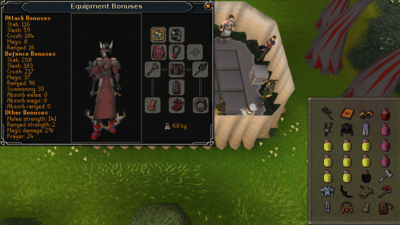
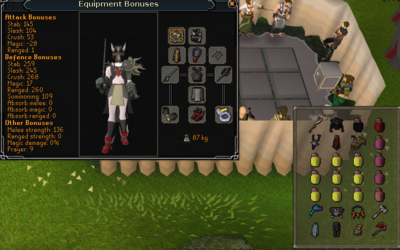
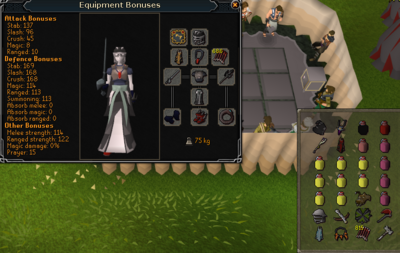
Here are some examples of gear and inventory. These are not hard requirements and can be upgraded/downgraded as necessary. Naturally, only use a Slayer Helmet if on a reaper task.
- Gear
- Wear your best possible melee gear, as you will use this first at Tekton
- Inventory
- Super restores, Saradomin brews & at least 1 dose of Overload. Adjust quantity to your own comfort.
- Mage and Ranged switches
- Rune pouch with Air & Wrath runes if using Fire Surge with Tome of Fire
- Statius Warhammer, Dragon Warhammer or Bandos Godsword
- Dragon Hatchet to speed up Ice Demon
- Vampyrism aura
Example Gear Setup:
- Melee Gear
Inquisitor can be replaced with Torva or Bandos & Scythe/Dragon Hunter Lance/Rapier with Dragon Defender. A whip may also be used at minimum. Ferocious Gloves are better than Goliath, or Barrows Gloves to minimise switches.
- Ranged Gear
If using any weapon other than the Bow of Faerdhinen, you will want Pernix > Armadyl > Royal Dragonhides. Swift gloves are fantastic but barrows are fine again to minimise your switches while learning. Weapon options: Twisted Bow > Faerdhinen/Decimation > Zaryte/Dragon Hunter Crossbow > Armadyl Crossbow > Dragon Crossbow. Ruby Dragon e bolts. A Blowpipe would also do well.
- Mage Gear
Harmonised Staff with Tome + Fire Surge is incredible throughout the raid. This can be downgraded to a Trident of the Swamp or Seas. For gear, you will want to use Kitted Ancestral > Virtus > Ancestral/Subjugation and an Occult Necklace or Arcane Stream.
Rewards
Upon completing the Chambers of Xeric, here is how it works for a unique chance : You have 1% chance of rolling the rare drop table per 6,9k points you earned during the raids. It can stack up to 570k points per attempt (which is about 82,5% at maximum). Up to 3 unique rolls per raid based on total party points Activating point hoarder will give you 50% more point for the time of duration. Pet chance (Olmlet) on any unique drop
Following that you receive a unique chance, here are the rates per items :
- Dexterous Prayer Scroll - 9/34 -> 26.5%
- Arcane Prayer Scroll - 9/34 -> 26.5%
- Twisted Buckler - 5/68 -> 7.4%
- Dragon Hunter Crossbow - 5/68 -> 7.4%
- Dinh's Bulwark - 1/17 -> 5.9%
- Ancestral robe set - 1/17 -> 5.9% (per piece)
- Elder Maul - 1/34 -> 2.9%
- Kodai Insignia - 1/34 -> 2.9%
- Twisted Bow - 1/34 -> 2.9%
- Ancestral Kit - 1/100 -> 1%
Challenge mode exclusive items/rates :
- Ancestral Kit - 1/35 -> 2.85%
- Twisted Kit / Kodai Kit - 1/100 -> 1%
- Metamorphic Dust - 1/200 -> 0.5%


