Difference between revisions of "Fight Kiln/Strategies"
| Line 9: | Line 9: | ||
* {{SCP|Herblore}}96+ Herblore: Recommended to have Overloads | * {{SCP|Herblore}}96+ Herblore: Recommended to have Overloads | ||
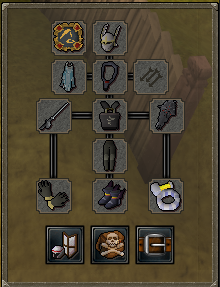
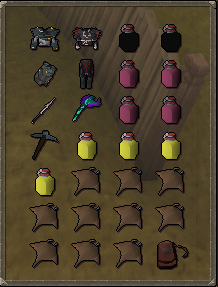
== Inventory | == Inventory & Gear == | ||
{| class="wikitable" | {| class="wikitable" | ||
! colspan="2"|<center>'''Example Gear Setup'''</center> | ! colspan="2"|<center>'''Example Gear Setup'''</center> | ||
|- | |- | ||
| [[File:Kiln Equipment.png]] || [[File:Kiln Inventory.png]] | | [[File:Kiln Equipment.png]] || [[File:Kiln Inventory.png]] | ||
|} | |||
# Having '''three''' combat styles makes it easier to take on all waves, as you will sometimes only face rangers/meleers/magers | |||
# Overloads, Saradomin Brews & Super Restores are good for boosting stats, combo eating and restoring stats & prayer. If you don't have those, you can use super sets, karambwans and prayer potions. | |||
=== Useful Auras & Relics=== | |||
{| | |||
|+ Auras | |||
|- | |||
| [[File:Master reverence aura.png]] || '''Master Reverence''' - Slows down prayer drain and increases prayer restoration from potions by 7%. | |||
|- | |||
| [[File:Vampyrism aura.png]] || '''Vampyrism''' - Gain life points equal to 5% of any damage you deal. | |||
|- | |||
|[[File:penance aura.png]] || '''Penance''' - Gain prayer points equal to 5% of any damage you receive. | |||
|- | |||
|[[File:Sharpshooter ayra.png]] || '''Sharpshooter''' - Gives offensive ranged attacks greater chance of hitting their target. | |||
|- | |||
|[[File:Greater runic accuracy aura.png]] '''Runic Accuracy''' - Gives offensive magic spells greater chance of hitting their target. | |||
|} | |||
{| | |||
|+ Relics | |||
|- | |||
| [[File:Gold FluidStrikes.png|32px|center]] || '''Fluid Strikes''' - Attack speed of melee weapons are halved. Melee attacks deal 10% more damage and have 25% more accuracy (excludes PvP). | |||
|- | |||
| [[[File:Gold QuickShot.png|32px|center]] || '''Quickshot''' - Attack speed of ranged weapons are halved. Ranged attacks deal 10% more damage and have 100% accuracy while saving 90% of ammunition (excludes PvP). | |||
|- | |||
|[[File:Gold DoubleCast.png|32px|center]] || '''Double Cast''' - Attack speed of magic weapons are halved. 90% of runes are saved when casting spells (excludes PvP). | |||
|} | |} | ||
Revision as of 20:24, 14 November 2022
Setup
Stat Recommendations
 92+ Prayer for Soul Split. Bare minimum 43 Prayer for Protection Prayers
 90+ Range
 85+ Strength
 80+ Attack
 75+ Defence:
 67+ Summoning for War Tortoise (96+ recommended for Pack yak or Steel titan)
 96+ Herblore: Recommended to have Overloads
Inventory & Gear
 |

|
- Having three combat styles makes it easier to take on all waves, as you will sometimes only face rangers/meleers/magers
- Overloads, Saradomin Brews & Super Restores are good for boosting stats, combo eating and restoring stats & prayer. If you don't have those, you can use super sets, karambwans and prayer potions.
Useful Auras & Relics
| Master Reverence - Slows down prayer drain and increases prayer restoration from potions by 7%. | |
| Vampyrism - Gain life points equal to 5% of any damage you deal. | |
| Penance - Gain prayer points equal to 5% of any damage you receive. | |
| File:Sharpshooter ayra.png | Sharpshooter - Gives offensive ranged attacks greater chance of hitting their target. |
| Fluid Strikes - Attack speed of melee weapons are halved. Melee attacks deal 10% more damage and have 25% more accuracy (excludes PvP). | |
| [[[File:Gold QuickShot.png|32px|center]] | Quickshot - Attack speed of ranged weapons are halved. Ranged attacks deal 10% more damage and have 100% accuracy while saving 90% of ammunition (excludes PvP). |
| Double Cast - Attack speed of magic weapons are halved. 90% of runes are saved when casting spells (excludes PvP). |
The Fight
Wave 1-10
- Waves 1 to 9:These waves are rather straightforward and should be easy to tackle. Taking out the TokHaar-Tok-Xil should be your priority, as they have powerful attacks and low lifepoints. Use Protect from/Deflect Ranged as long as they are alive, and kill them with Melee. On waves that feature the TokHaar-Mej or TokHaar-Ket-Zek, use Protect from/Deflect Magic and take out the Tok-Xil first, and then deal with the Mej or Ket-Zek with Ranged attacks. An exception to this would be wave 7, where it would be easier to kill the single Mej using Ranged first while praying Protect from/Deflect Ranged. In wave 5, avoid TokHaar-Ket-Dill by running away from it - leaving its wander zone will cause it to lose interest in you, allowing you to deal with the other threats first before taking Ket-Dill out last.
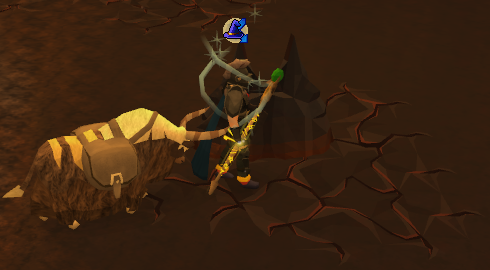
- Wave 10: This wave marks your first battle against a TokHaar-Jad. Before this wave starts, stand behind the northern end of the Kiln Stone in the centre of the arena (picture to the left) to lure both the Tok-Xil and Jad towards you. Once they are lured into position, take out the Tok-Xil and then deal with Jad.
Wave 11-19
- Waves 11 to 19: As almost every wave features at least one TokHaar-Ket-Zek, you will be making heavy use of Protect from/Deflect Magic. As such, your priority should be to take out any TokHaar-Tok-Xil as soon as possible, as they will be the only creature capable of dealing heavy damage to you. It is also recommended to wear your melee armour to cover your weak spot.
- Waves 17 and 18: These waves mark your first encounter with TokHaar-Yt-MejKot. Fortunately, it does not possess the ability to heal other monsters, and is rather large and thus easy to trap. You can use the Kiln Stone or other monsters to get Yt-MejKot safely out of melee distance, and dispatch them last with Magic. As usual, it is advised to use Protect from/Deflect Magic and take out the Tok-Xil first.
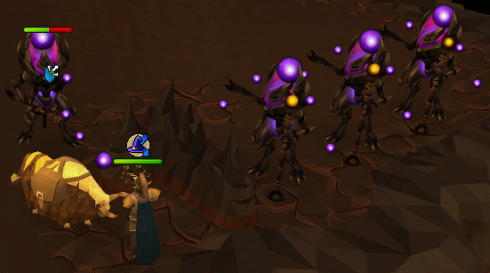
- Wave 19: This wave pits you against eight TokHaar-Mej and a TokHaar-Ket-Dill. Once more, avoid Ket-Dill until you are out of its wander zone, then dispatch all eight Mej using Ranged attacks. Because of the sheer number of Mej, it may be worthwhile to activate a Ranged Crystal if you collected one - this will significantly speed up your kills against the Mej. The Mej can be easily lured by standing inside the rock formation to the south-east. Once all eight Mej are down, deal with TokHaar-Ket-Dill, making use of the Kiln Stone if needed.
Wave 20 - 27
- Wave 20: Before this wave starts, stand behind the northern end of the Kiln Stone, which will lure both TokHaar-Jad and TokHaar-Ket-Zek towards you. If you are still under the effects of the Ranged Crystal, make use of it and take out Ket-Zek using Ranged attacks. Once Ket-Zek is down, deal with Jad as before.
- Waves 21 to 24: These waves consist of monsters that only use Melee attacks. As such, you can make use of the Kiln Stone to trap these monsters and kill them individually. Regardless of whether you trap them or not, you can easily blaze through these waves with Magic and Protect from/Deflect Melee. As these waves are extremely easy, you could get away with making use of Soul Split to conserve your supplies. Using a magic crystal would speed up these waves, however it may be best to save them until later waves.
- Waves 25 to 27: As these waves feature TokHaar-Ket-Zek, use Protect from/Deflect Magic. Trap the TokHaar-Yt-MejKot by using the Kiln Stone or the other monsters, and then proceed to take out the TokHaar-Tok-Xil immediately. Afterwards, kill the Ket-Zek and then the Yt-MejKot.
Wave 28-37
Wave 28
- Wave 28: The infamous armadillo wave, and easily the most time- and supply-consuming wave, this wave pits you against six TokHaar-Ket-Dill and one TokHaar-Ket-Zek. You will need to use Protect from/Deflect Magic as long as the Ket-Zek is alive. Avoid running through large groups of TokHaar-Ket-Dill, as they can easily deal copious amounts of damage or even kill you if they make use of their special attack. Instead, start out at the northeastern corner of the Kiln. This area falls under the wander zone of one of the TokHaar-Ket-Dill, and by making use of the wall along the north edge of the Kiln, it should be possible to trap it behind it, leaving your only immediate threat being the Ket-Zek. Dispatch the Ket-Zek with Ranged, then proceed to deal with the TokHaar-Ket-Dill you have trapped. Once it is dead, attract the attention of the other TokHaar-Ket-Dill individually and deal with them slowly one by one. Take your time on this wave and do not panic, as dealing with the TokHaar-Ket-Dill is an extremely tedious task.
Wave 29
- Wave 29: After the ordeal of wave 28, this wave is extremely simple. Use Protect from/Deflect Melee and kill all six TokHaar-Yt-MejKot with Magic, standing behind the northern side of the Kiln Stone to keep four of them trapped.
Wave 30
- Wave 30: Before this wave begins, position yourself behind the northern end of the Kiln Stone, once more luring TokHaar-Jad up to it. Use Protect from/Deflect Melee and deal with the two TokHaar-Yt-MejKot on the north side of the Kiln, and then kill the last one on the southeastern side. Finally, take out TokHaar-Jad.
Wave 31 to 33
- Wave 31 to 33: Each of these waves consists of only one type of monster in each. As such, you can make use of each protection/deflection prayer and kill off the monsters with the combat style they are weak against.
Wave 34
- Wave 34: Stand on the northern end of the Kiln Stone before this wave starts. This will trap TokHaar-Jad and TokHaar-Tok-Xil on the southern end of the Stone. Kill TokHaar-Yt-MejKot, and then take out TokHaar-Tok-Xil before dealing with Jad.
Wave 35
- Wave 35: It is advised to make use of an Invulnerability Crystal as this wave starts. You will be dealing with all three combat styles, including Jad, and the spawn positions of this wave can make it extremely deadly. Stand on the northern end of the Stone, which will trap TokHaar-Ket-Zek behind it, leaving you to deal with the other three first. Make use of this time to kill TokHaar-Tok-Xil with Magic or Ranged, and then TokHaar-Yt-MejKot, before fighting Jad immediately afterward. If you choose not to use an Invulnerability Crystal, keep an eye out for Jad's attack while you kill Tok-Xil and Yt-MejKot. Once all three are dead (easier said than done), kill off TokHaar-Ket-Zek.
Wave 36
- Wave 36: The Double Jad wave, this wave pits you against two mighty TokHaar-Jad at once. Fortunately, the Kiln Stone still stands, making this wave much easier than it first appears. Position yourself on the northern end of the Kiln Stone, which will trap both TokHaar-Jadz on the southern end. This allows you to deal with them individually, making this wave relatively easy.
UNLEASH THE HAR-AKEN!
If you have managed to survive the onslaught of the previous 36 waves, you will have a chance to face an ancient monstrosity in this final challenge of the Fight Kiln. The Har-Aken is a humongous beast, consisting of a head and multiple tentacles capable of attacking you with all three combat styles.
Defeating Har-Aken will require both offensive and defensive capabilities. The key to defeating this creature is by reducing the lifepoints of its head to zero, killing it as a result. However, the battle is not that straightforward; Har-Aken's head only surfaces briefly, allowing you to make a few attacks on it, before it dives beneath again. Throughout the battle, you will also have to contend with the multitude of tentacles that continuously rise towards to the surface; these will assail you with Ranged and Magic attacks, and additionally Melee attacks if you get close enough to them. As you might be low on supplies from the previous waves, it is best to get this battle over with as quickly as possible.
When this wave begins, equip your Magic switches, and activate Protect from/Deflect Ranged. When you see its head surface, activate a Magic Crystal and attack the head. Make use of this period to deal as much damage to it as possible. When the head dives down, move towards a corner of the map that has fewer tentacles near it - this will ensure that you are under attack from as few tentacles as possible. Take out the Magic tentacles using your spells, and continuously scan the area to note when Har-Aken's head resurfaces. Make use of this time to heal yourself as much as possible - you want to spend the time when Har-Aken's head surfaces by attacking it as much as possible. When Har-Aken's head resurfaces, continue this process.

