Difference between revisions of "Chambers of Xeric/Strategies"
(→Olm) |
|||
| (5 intermediate revisions by 2 users not shown) | |||
| Line 20: | Line 20: | ||
*{{SCP|Farming|55+}} if you are going to make supplies. | *{{SCP|Farming|55+}} if you are going to make supplies. | ||
*{{SCP|Herblore|78+}} to make Xeric Aid's. {{SCP|Herblore|90+}} to make Overload+. | *{{SCP|Herblore|78+}} to make Xeric Aid's. {{SCP|Herblore|90+}} to make Overload+. | ||
=== Auras & Relics === | |||
{| | |||
|+ | |||
|- | |||
| [[File:Gold PointHoarder.png|32px|center]] || '''Point Hoarder''' (Gold) Earn 50% more points when completing raids. | |||
|- | |||
|[[File:Gold DoubleCast.png|32px|center]] || '''Double Cast''' (Gold) Doubles your mage attack speed, increases accuracy by 25% and saves 90% of runes. | |||
|- | |||
|[[File:Gold FluidStrikes.png|32px|center]] || '''Fluid Strikes''' (Gold) Doubles your melee attack speed, increases melee damage by 10% and accuracy by 25%. | |||
|- | |||
|[[File:Vampyrism aura.png]] || '''Vampyrism''' - Gain life points equal to 5% of any damage you deal. | |||
|- | |||
|[[File:penance aura.png]] || '''Penance''' - Gain prayer points equal to 5% of any damage you receive. | |||
|- | |||
|} | |||
==Tekton== | ==Tekton== | ||
| Line 26: | Line 42: | ||
Pick up his overload/drop it for team mates if necessary. | Pick up his overload/drop it for team mates if necessary. | ||
[[File:Tekton.png|thumb| | [[File:Tekton.png|thumb|400px|An example of marked tiles for Tekton.]] | ||
<br> | <br> | ||
| Line 32: | Line 48: | ||
<br> | <br> | ||
The layout for this room is always the same. Everyone has a different method for this, so find something that works for you. Here's an example. | The layout for this room is always the same. Everyone has a different method for this, so find something that works for you. Here's an example. | ||
[[File:Crabs.png|thumb| | [[File:Crabs.png|thumb|400px|Marked tiles example.]] | ||
Note: For this example, the marked tiles are where you want the crabs to be, not where you stand. | Note: For this example, the marked tiles are where you want the crabs to be, not where you stand. | ||
| Line 57: | Line 73: | ||
==Lizardman Shamans== | ==Lizardman Shamans== | ||
Walk into the room enough so that they aggro you, and run back to the entrance to safespot them. Kill with ranged, or mage if using Double Cast. | Walk into the room enough so that they aggro you, and run back to the entrance to safespot them. Kill with ranged, or mage if using Double Cast. | ||
[[File:Shamans.png|right|thumb|400px|shaman safespot.]] | |||
Shamans.png|thumb|shaman safespot | |||
==Olm== | ==Olm== | ||
| Line 96: | Line 111: | ||
During this phase, special attacks will continue so be on the lookout for those. Otherwise, switch to your ranged gear and finish off the head to end the raid. | During this phase, special attacks will continue so be on the lookout for those. Otherwise, switch to your ranged gear and finish off the head to end the raid. | ||
<gallery> | |||
Olmhealing.png|The symbol which displays when Olm hand will heal | |||
</gallery> | |||
==Equipment== | ==Equipment== | ||
| Line 111: | Line 131: | ||
:*Vampyrism aura | :*Vampyrism aura | ||
Example | <big>Example Gear Setup:</big> | ||
{| class="wikitable" | |||
|+ The Setup | |||
Coxgearsetup.png| | |- | ||
! [[File:Coxgearsetup.png|400px|thumb|1st Example Setup]] !! [[File:Coxsetup2.png|400px|thumb|2nd Example Setup]] !! [[File:Coxvoid1.png|400px|thumb|Void Example Setup]] | |||
|} | |||
*'''Melee Gear''' | *'''Melee Gear''' | ||
Inquisitor can be replaced with Torva or Bandos & Scythe/Dragon Hunter Lance/Rapier with Dragon Defender. A whip may also be used at minimum. Ferocious Gloves are better than Goliath, or Barrows Gloves to minimise switches. | Inquisitor can be replaced with Torva or Bandos & Scythe/Dragon Hunter Lance/Rapier with Dragon Defender. A whip may also be used at minimum. Ferocious Gloves are better than Goliath, or Barrows Gloves to minimise switches. | ||
Latest revision as of 06:57, 17 May 2023
This is a strategy guide for completing the normal mode of the Chambers of Xeric.
Getting There
The easiest way to get to the Chambers of Xeric is by using the Portal Nexus at ::home.
Overview
The normal mode for Chambers of Xeric consists of Tekton, Crabs, Scavenger Beasts, Ice Demon, Lizardman Shamans and Olm.
Rcommended Stats:
 90+ Defence
 90+ Strength
 90+ Attack
 90+ Range
 90+ Magic
 90+ Hitpoints
 70+ with Piety unlocked.
  74+ unlocks Rigour and
  77+ unlocks Augury that are highly beneficial.
 70+ Woodcutting
 55+ if you are going to make supplies.
 78+ to make Xeric Aid's.
  90+ to make Overload+.
Auras & Relics
Tekton
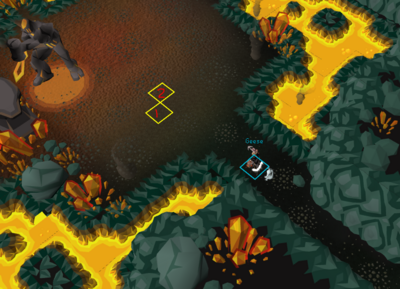
You'll fight Tekton with melee and protect from melee. Dump your swh/dwh/bgs specs and finish off with your melee weapon of choice. He's weakest to crush so an Inquisitor Mace excels but you can get by with a rapier or whip. Start on tile 1 and move between that and 2 so that he's not facing you and you will take minimal damage.
Pick up his overload/drop it for team mates if necessary.
Jewelled Crabs
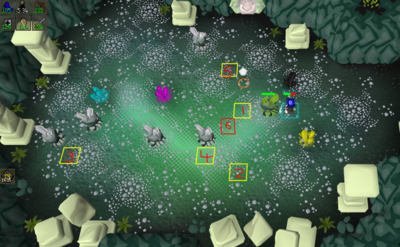
The layout for this room is always the same. Everyone has a different method for this, so find something that works for you. Here's an example.
Note: For this example, the marked tiles are where you want the crabs to be, not where you stand.
Pink crystal = Hit with Ranged. Blue crystal = Hit with Melee. Black Crystal = Hit with white crabs (Will need to wait for colour to fall off). Yellow Crystal = Hit with Mage.
Hit any crab with a ranged weapon and drop it on the tile marked 1. This will hit the pink crystal.
Then, take that crab to tile 2 and right-click 'Smash' it so it stays. Grab any other crab and drag it to tile 3 where you want to hit it with a melee weapon, don't smash this one.
After the melee crystal is hit, take that crab over to tile 4 and smash it there. Re-smash the crab on tile 2.
Grab another crab and take it up to tile 5 and wait for it's colour to change back to white which should kill the black crystal. Then either take this crab (or a different one if you smashed it on 5) and put it on tile 6 which you should hit with a mage attack.
You may have to re-smash the crabs on tiles 2 and 4 periodically, especially if other crabs get in the way and mess you up.
In a team setting you can split the positioning or have 1 player hit some crabs and keep them out of the way.
Ice Demon
Pray range and use range or mage to kill. Mage especially if using Double Cast.
Deposit your brews in the chest and chop the tree. Take the kindling and light the Brazier's. Repeat until his health bar depletes at which point he'll thaw and come out for the fight. Don't forget to take your brews back out.
Lizardman Shamans
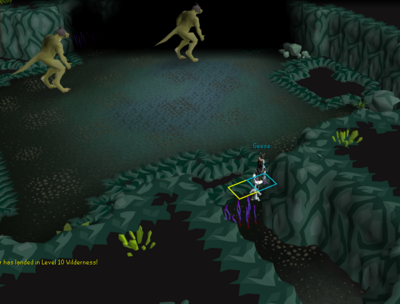
Walk into the room enough so that they aggro you, and run back to the entrance to safespot them. Kill with ranged, or mage if using Double Cast.
Olm
Olm has three phases which consist of attacking his left hand with mage, and his right hand with melee. After this, there is a final phase against his head which you fight with ranged. You will want to make use your defence reducing spec weapon on the melee hand.
Olm switches his basic attacks between ranged and mage, so you'll have to switch prayer accordingly. Ranged attacks are the smaller green crystals and Mage attacks are the larger green blobs. There is no way to tell which he will use, but he is more likely to use the same attack style as his previous attack.
During phase transitions, there will be falling crystals that explode and deal some damage in a 1 tile radius around where they land. Keep moving to avoid these.
Spheres: Olm may randomly pick a sphere (red, green or purple) and send it at the player. If not blocked, you will take damage. If a protection prayer was used when the sphere was launched, it is disabled and the player's Prayer is reduced. To block the attack, pray accordingly before the sphere hits you. This will also be indicated in your chatbox.
  Red (sphere of aggression): Protect from Melee
  Green (sphere of accuracy and dexterity): Protect from Missiles
  Purple (sphere of magical power): Protect from Magic
Crystal Burst: Olm may spawn a crystal underneath where you're currently standing which after a few seconds will erupt for 35 damage. This will be indicated below you and Olm will display a crystal sign on his melee hand. This often, but not always, follows up after his teleport swap.
Teleport Swap: Periodically, Olm will designate pairs of players to be highlighted with a white glow beneath them. After a few seconds when this mechanic resolves, the targeted players switch places. The damage taken scales depending on how far away the portals are from each other. In a team situation, it's best for both players to agree where to stand to resolve this. Generally, this will be in front of the thumb on the melee hand. In a solo situation, the 2nd portal will be randomly placed in the arena.
Lightning: Olm will display a lightning sign on his melee hand and fire rows of lightning that moves fairly slowly across the arena. This never usually hits the row directly in front of olm. If you get hit by one, turn your prayers back on asap.
The above attacks can happen throughout the fight. There are also phase specific attacks in addition to them.
Acid: Olm will spray acid randomly across the room. This is fairly easy to avoid.
Olm will also occasionally target one player with an acid drip causing them to become poisoned and trail acid wherever they move. If you stand still, you will take a couple of damage every tick from the poison until the effect ends. The target is also indicated in your chatbox. This can also hurt your allies so be careful with positioning if moving. The poison effect will remain on you throughout the fight but the damage is negligible especially if using Vamp aura.
Flame: Olm will shoot out two lines of fire blocking off a column around the targeted player. If you're constantly moving, you should avoid this easily. If you're caught by it, pray mage otherwise it'll deal damage to you once it resolves after about 5 seconds.
Crystal: Olm targets a player with a red aura and fires crystals after them. This will also be indicated in the chatbox. Just keep moving as each crystal that hits you can deal about 15 damage. You won't be able to attack with mage without risking being hit, however if you're during melee hand, you can run away, attack the hand, repeat without taking damage. Just be aware not to overlap other players as this can hurt them too.
Third Phase: This phase, while similar to the first two has some very important differences. Foremost, both hands must be killed within a certain amount of time of each other. His melee hand can occasionally indicate that it is healing and any damage done will restore health instead. You will want to bring the melee hand down quite low and attack the mage hand when the melee hand is healing. Once the melee hand is low but not dead, bring the mage hand down enough so you can finish it with one or two hits. Finish off the melee hand if it's not healing, then kill the mage hand afterwards. If you kill the mage hand first, you risk the melee hand entering its healing phase for a few seconds, making it less likely you'll be able to kill the melee hand on time. The timer for this will be indicated on the health bar of the hand you killed first. If you fail to kill the other hand before this bar completes, the phase will reset.
Final Phase: During this phase, special attacks will continue so be on the lookout for those. Otherwise, switch to your ranged gear and finish off the head to end the raid.
Equipment
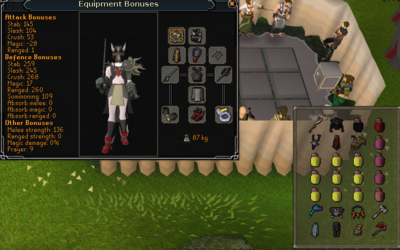
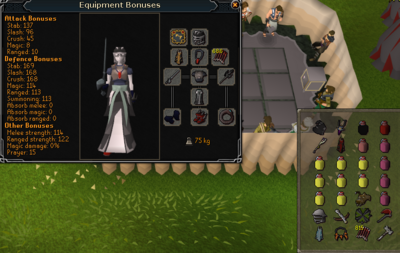
Here are some examples of gear and inventory. These are not hard requirements and can be upgraded/downgraded as necessary. Naturally, only use a Slayer Helmet if on a reaper task.
- Gear
- Wear your best possible melee gear, as you will use this first at Tekton
- Inventory
- Super restores, Saradomin brews & at least 1 dose of Overload. Adjust quantity to your own comfort.
- Mage and Ranged switches
- Rune pouch with Air & Wrath runes if using Fire Surge with Tome of Fire
- Statius Warhammer, Dragon Warhammer or Bandos Godsword
- Dragon Hatchet to speed up Ice Demon
- Vampyrism aura
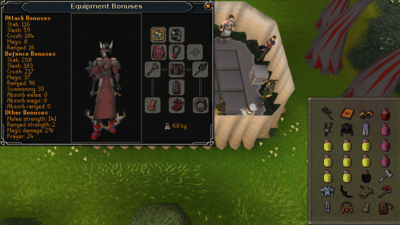
Example Gear Setup:
- Melee Gear
Inquisitor can be replaced with Torva or Bandos & Scythe/Dragon Hunter Lance/Rapier with Dragon Defender. A whip may also be used at minimum. Ferocious Gloves are better than Goliath, or Barrows Gloves to minimise switches.
- Ranged Gear
If using any weapon other than the Bow of Faerdhinen, you will want Pernix > Armadyl > Royal Dragonhides. Swift gloves are fantastic but barrows are fine again to minimise your switches while learning. Weapon options: Twisted Bow > Faerdhinen/Decimation > Zaryte/Dragon Hunter Crossbow > Armadyl Crossbow > Dragon Crossbow. Ruby Dragon e bolts. A Blowpipe would also do well.
- Mage Gear
Harmonised Staff with Tome + Fire Surge is incredible throughout the raid. This can be downgraded to a Trident of the Swamp or Seas. For gear, you will want to use Kitted Ancestral > Virtus > Ancestral/Subjugation and an Occult Necklace or Arcane Stream.
